Learn more by accessing the link beside https://shre.ink/aX5Z

SEE PC SCREEN LIVE
View your PC screen live remotely over the Internet using a web browser. Just as if you were sitting right in front of it.
Also, screen recordings can be archived/historicized/saved if desired. This way you can view the recordings at a later time. Activating this function requires sending an email to kontakt@wolfeye.de with the subject “Activate archiving” (also possible in the trial version). Activation can take 1 to 2 hours.
SCREENSHOTS AND SITES VISITED
Take screenshots regularly and see what the user sees! Check visited websites and monitor browsing behavior! Why: Screen recordings can be archived/historicized/saved upon request. This way you can view the recordings at a later time. Activating this function requires sending an email to kontakt@wolfeye.de with the subject “Activate archiving” (also possible in the trial version! Please send an email!). Activation can take 1 to 2 hours.

INVISIBLE AND WINDOWS STARTUP
Runs invisibly and starts on Windows startup. Perfect for employee monitoring or son or daughter PC monitoring.
REMOTE MONITORING
Find out what is currently being done on the computer: is work being done productively or is time wasted on portals like Facebook? Do you attend online classes or watch or play on YouTube at the same time? You can conveniently view the PC’s live screen remotely via the Internet with a web browser. You can use any PC or even your cell phone for this.
How can Wolfeye help you?

Monitor user screen activity.
Time is money, and you want to make sure you and your team are making the best use of this valuable asset. However, studies show that almost a third of employee time is spent on social media and entertainment websites.
Luckily, Wolfeye screen monitoring software solves such problems by allowing you to see the employee’s screen. With this tool you can see what they are doing.
The Real-Time Screen Capture Tool is a powerful program that allows you to take real-time screenshots and monitor your team or an individual remotely. Besides, it can also take and save screenshots for further tracking.
Wolfeye is very flexible and can be used in any industry to monitor employee productivity: ideal for lawyers, startups and small/medium-sized businesses.
Our real-time screen recording tool frees you from constantly monitoring screens. It can automatically capture and record real-time screenshots. In addition, you can save the screenshots for later use.

How does monitoring software help with performance and costs?
Managing your workforce, especially remote teams, comes with some challenges.
It is difficult to know when employees start work and what they are working on. It’s hard to verify how much time they spend on each task assigned to them. All of these things jeopardize team productivity.
Wolfeye real-time screen recording tool helps solve all these problems. It provides a record of the following points:
1. When the team members arrived.
2. What they are currently working on.
3. How much time a single task or project takes.
4. Which websites and apps employees use while working on their task or project.
You can use all of this insight to identify gaps in productivity and work accordingly on necessary improvements.
In addition, these tools offer employees help to help themselves. By reading their productivity stats, they can quickly correct their time-wasting behavior. The tool also protects businesses from threats like malware attacks and potential conflicts.
In this way, Wolfeye’s real-time screen recording tool helps identify wasted time, increase productivity across the team, and reduce unnecessary costs.
Luckily, screen monitoring is legal under most conditions. So put your legal concerns aside because you can effectively monitor your employees with Monitask Real-time Screen Monitor.
Not convinced yet? Use the FREE trial now and explore the unique features for yourself.
Wolfeye Software Tutorial
Step 1: Set an exception in the antivirus program
The first step begins even before the download: You have to select the download or installation folder and add it to the exception list of the antivirus program – this is important.
Because Wolfeye Remote Screen is a surveillance software and therefore works like a „hacking tool“. For this reason, antivirus programs see the application as suspicious.
However, just putting the folder into which you will copy the application into the exception is sufficient, because the application only operates within this folder and does not copy anything into it or do anything else.
It is important that when choosing this folder – when choosing this path – we choose a folder on which every PC user has write rights. Because of course we want to use the application to be able to monitor any user on this PC.
And for this reason we should best choose a folder on C:\Users\Public or C:\Users\Public. Some examples are C:\Users\Public\Pictures, C:\Users\Public\Documents, C:\Users\Public\Music, C:\Users\Public\Videos …
I will choose one of these public folders – for example this C-user-public-video – and create the folder named winupdate there (the folder name can be anything):
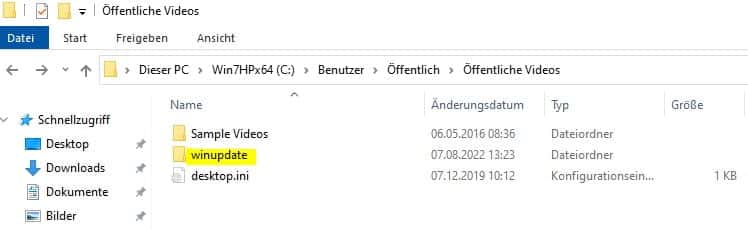
We will copy Windows Remote Screen into the winupdate folder. First we will put this folder in the antivirus exceptions.
How to do this depends on which antivirus program you are using. If you want to know how your antivirus program works, send us an email and tell us which antivirus program you use. We will give you the instructions for setting up an exception in your antivirus program. There are antivirus programs in which the exception must be set in different places. Because, for example, there is a live scan and a general scan. So please send us an email if you have any questions.
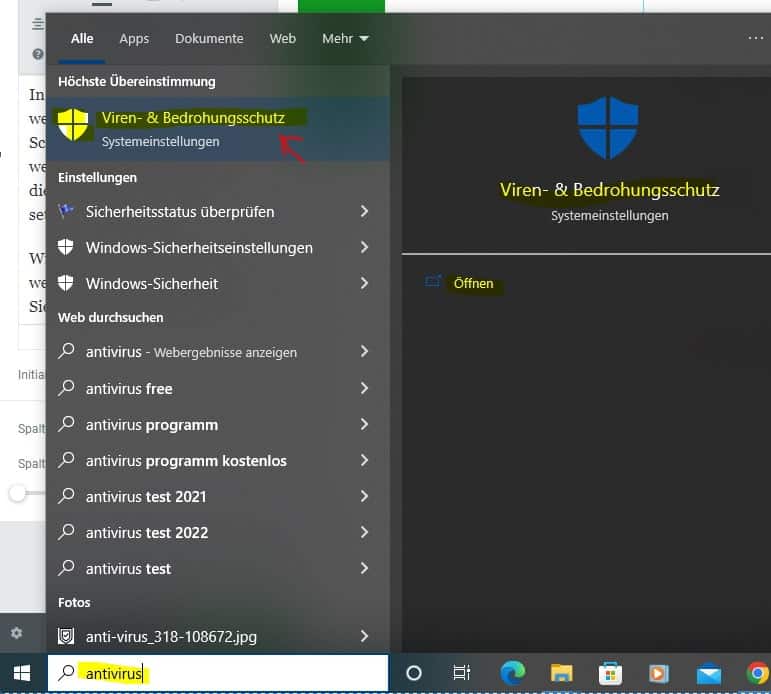
I now show here how to set such an exception in the Windows Defender Security Center of Windows. I do this by typing here in the Windows search box, then Antivirus, and clicking Virus and thread protection:
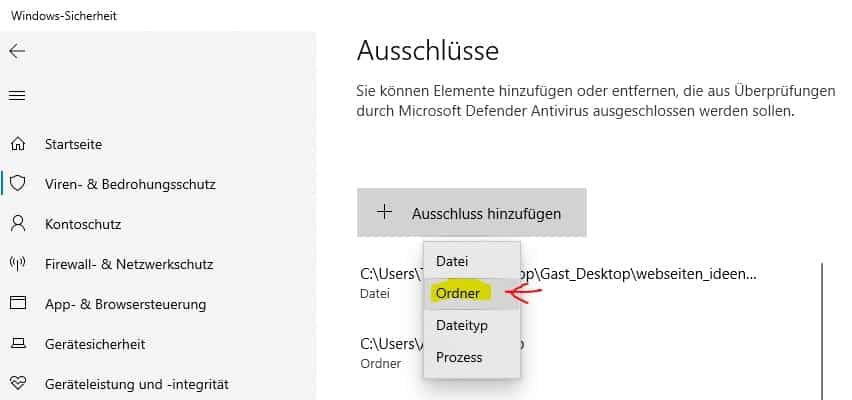
Virus and threat protection opens and next I go to Virus and threat protection settings (thread and protection settings). A page appears, I have to scroll down and click on exclusions. And here I can add or remove exclusions:
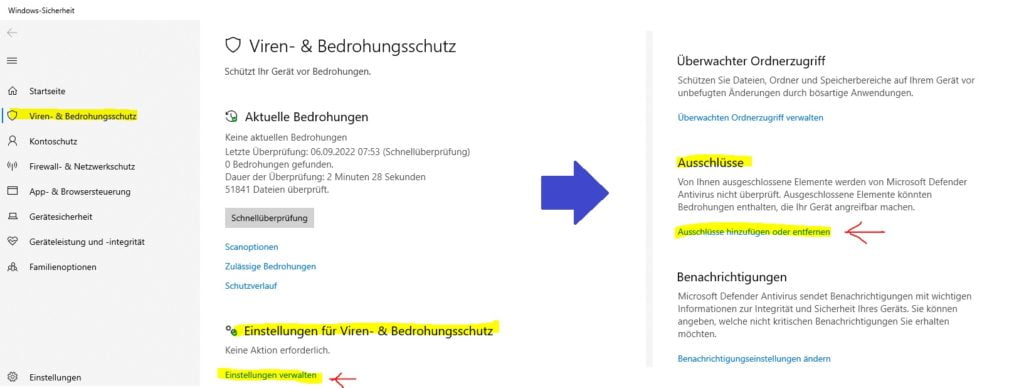
And I can choose to put a specific file or folder in the antivirus exception. But I choose a folder because I want to add the whole folder. I click on it now and enter the folder „winupdate“. With this, the antivirus program will continue to scan everything normally, but skip one folder during the scan:
Step 2: Download Wolfeye Remote Screen
After putting the winupdate folder in the antivirus exception, we can download Wolfeye Remote Screen.
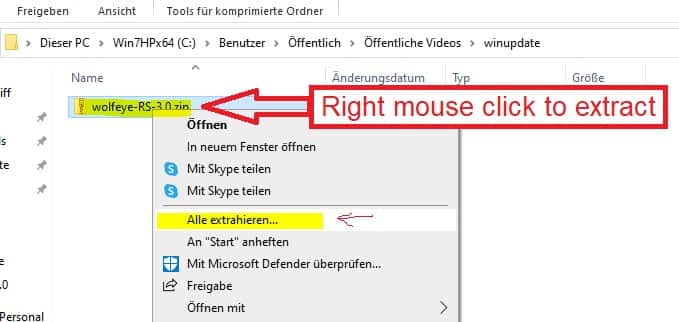
The download is a .ZIP file. Once downloaded, copy the .ZIP file to the winupdate folder we just placed in the antivirus exception. Right click on the .ZIP file and extract the contents of the .ZIP file to the winupdate folder. The password of the .ZIP file is wolfeye:
Now you can run the application by double clicking on the .EXE file:

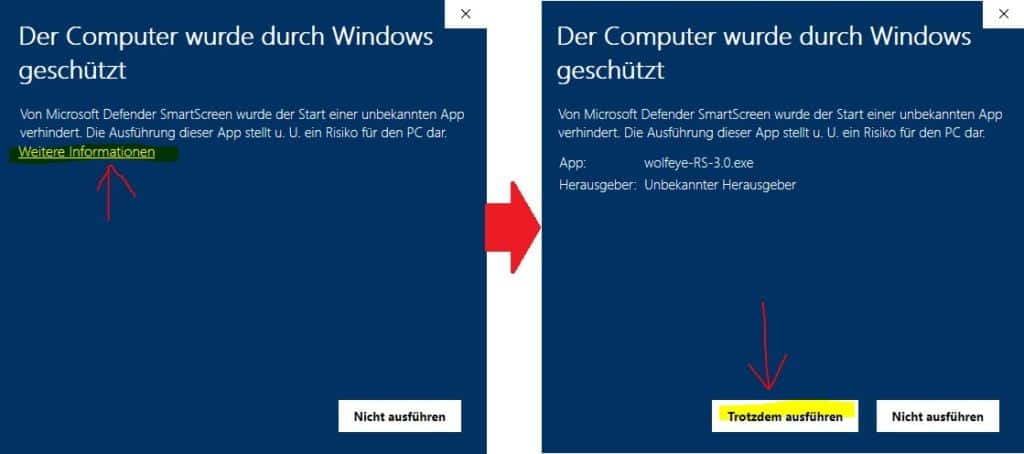
When you run it for the first time, a Windows message appears. Here you have to click on „more information“ and „run anyway“. Of course, this message only appears the first time Wolfeye Remote Screen is run:
Step 3: Set up / start Wolfeye Remote Screen
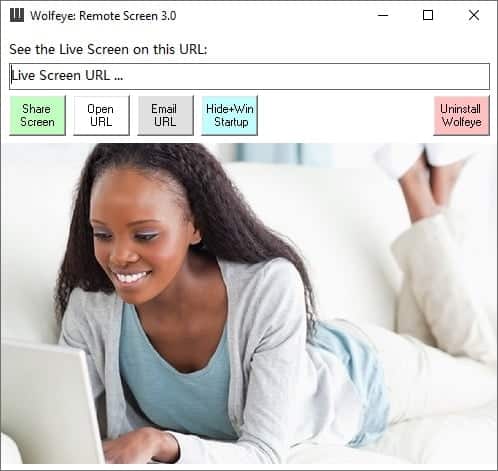
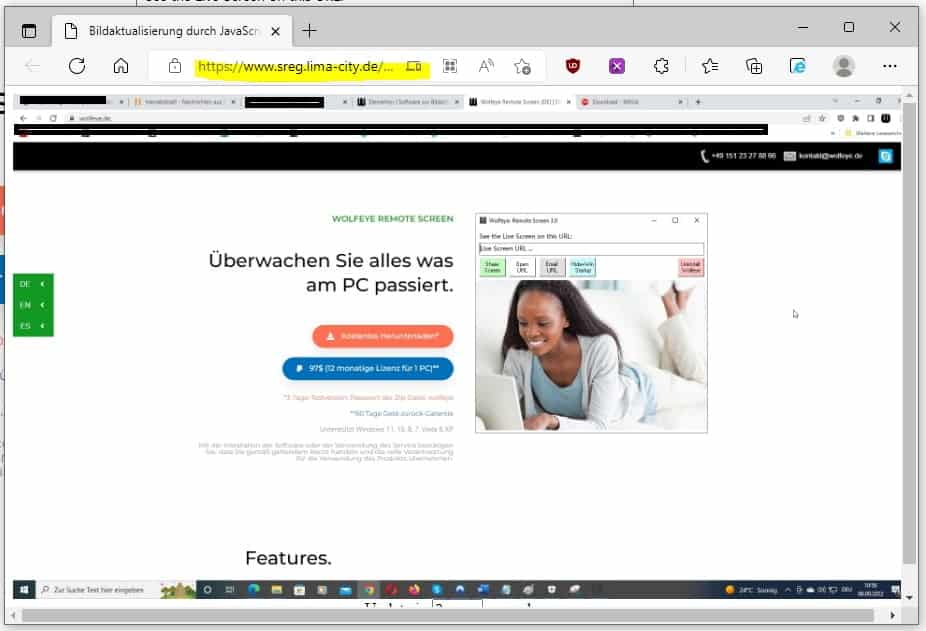
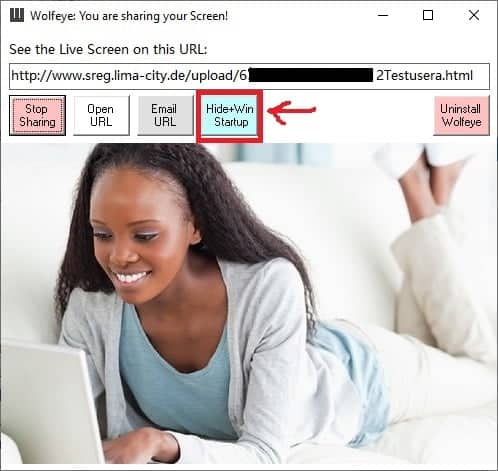
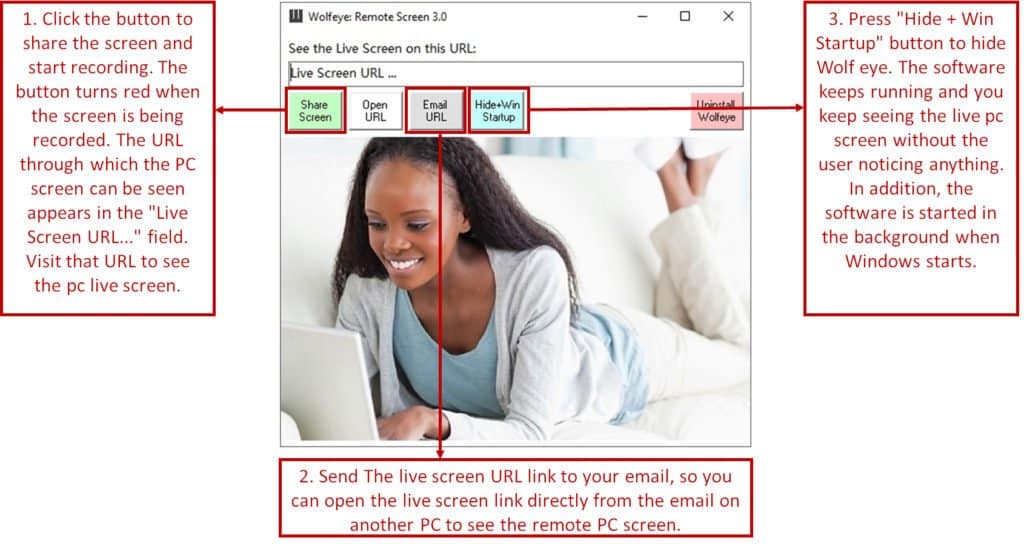
Double-clicking on the Wolfeye application (.EXE file) will bring up the Wolfeye Remote Screen control window. You can now press the „Share Screen“ button to start recording the screen. You know the computer screen is being recorded when the button turns red. The URL / website on which the live screen transmission can be seen appears in the top bar:
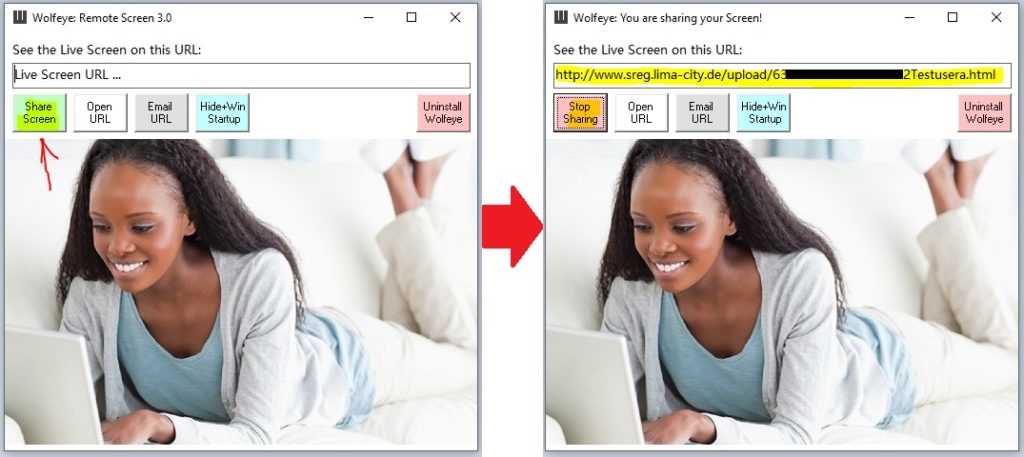
You can see the computer live screen over the Internet with any browser (for example, also with your mobile phone). The URL where the computer’s live screen can be seen appears in the top bar. The URL consists of the hardware ID and the user name of the PC. The „Open URL“ button opens the link to the live screen:
This URL / this link can also be conveniently sent by email using the „Email URL“ button. This email can then be opened on the remote computer or mobile phone from which the computer is to be monitored.
In order for Wolfeye Remote Screen to hide and continue recording in the background, press the „Hide+Win Startup“ button. The Wolfeye control window will then disappear and remain in the background. In addition, the monitoring is also started every time Windows is restarted:
The following graphic summarizes the important steps of the setup:
Last Check:
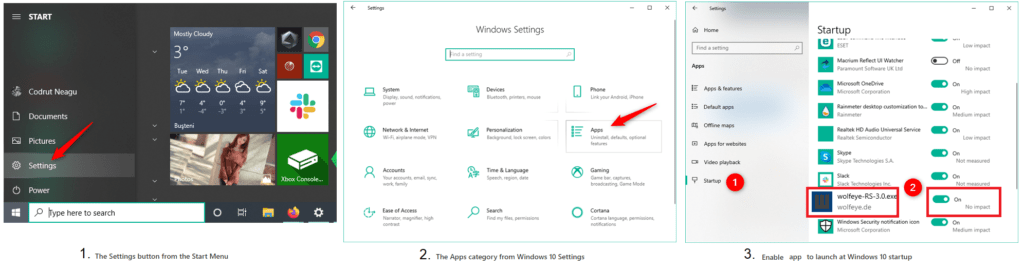
Please check if the Windows startup feature is approved (in most cases it is approved). To check this, go to Settings via the Windows Start menu, then to Apps and finally to Startup / Autostart. There, look for Wolfeye and turn on the lever if it isn’t. The illustration will take you there:
Stop recording:
Recording with Wolfeye Remote Screen will stop when you open the application (by double-clicking the .EXE file). Of course, the recording is also ended by pressing the „Stop Sharing“ button. The software is uninstalled and completely removed from the PC via the „Uninstall Wolfeye“ button.
Capture and save screenshots for follow-up monitoring:
If you want to take or save the screenshots in order to view the screen recordings at a later date, send an email to kontakt@wolfeye.de!
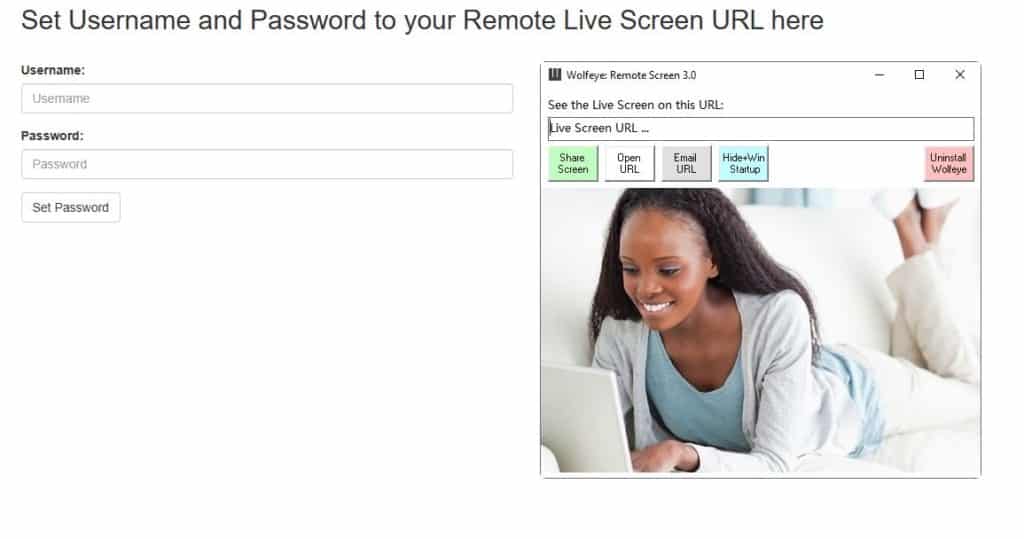
Password Protection of Remote Live Screen URL:
If you want to protect the Remote Live Screen URL with a password, send an email to kontakt@wolfeye.de!
This is of course highly recommended! This is switched off by default, but a short message via email is sufficient to activate the password protection.
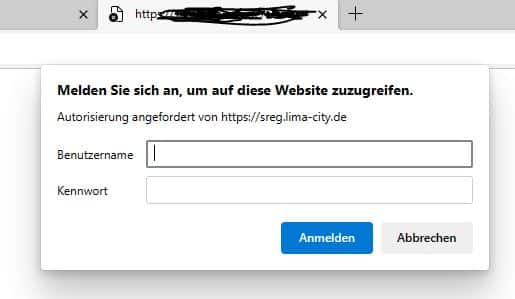
You will then receive a link to set your personal password:
After you have set your personal password, you need a password to open the remote live screen via the link:
What happens after the trial period ends?
The software can be used free of charge within 3 days. After this test period has expired, the information about license registration is automatically switched on in the live screen URL.
After purchasing a license, however, you will automatically see the screen again as usual. So you don’t have to do anything on the PC, it’s all done on the server side.
In concrete terms, this means: everything is already set up on the computer and after the test period has expired, there is no message on the monitored PC. The message just appears on the URL you want to view the live screen from.
Learn more by accessing the link beside https://shre.ink/aX5Z